
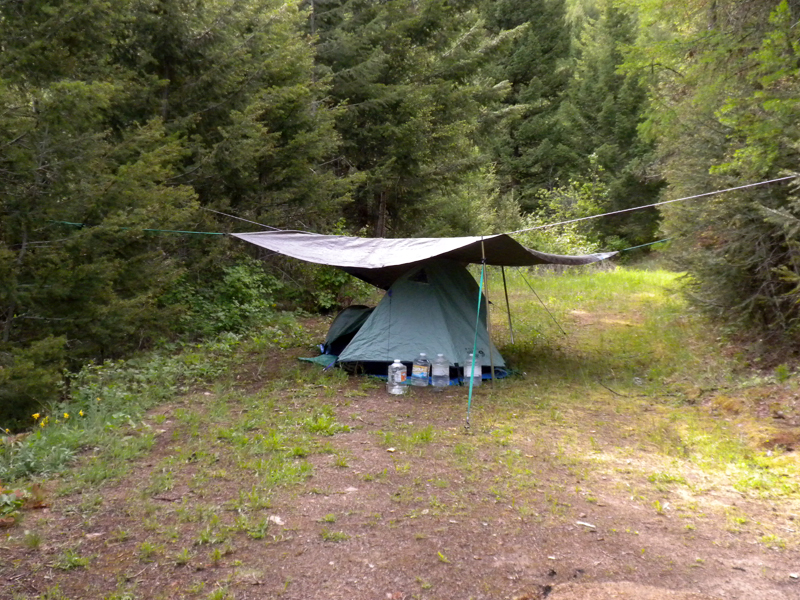
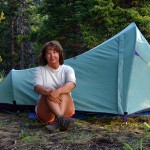
My current digs, one person bivy tent with tarp.
This is my second article in a series on homelessness for those with environmental illness (EI). These are difficult topics to cover since I have found almost every person is different with respects to diet, containers used for storage, etc.
WATER
This is second to shelter for surviving outdoors. I carry 13-16 gallons of water. You will need to ration using the following priorities: drinking, cooking, washing and washing clothes. If you are near a reliable water source (campground, river, stream) you can be a little lax, but when in remote places with no water this is a precious commodity. You always have to have a contingent plan and never let your water supply drop to less than two gallons before resupplying. If something happens and you are stranded, these two gallons can save your life.
In the desert they say a person needs a gallon of water per day to survive. I figured a person can go with a little less if they remain inactive during the heat of the day, stay in the shade and sip the water. There is also a technique of sucking on a pebble to help satiate thirst. You also can hold the water in your mouth and swallow a little at a time. In the woods you can stretch it out a little more, but not much.
Always carry iodine tablets. I don’t care about toxicity when my life is in danger and I need water to survive. This last winter I was forced to get water from a questionable source and boiled 3 gallons of water to a rolling boil for 10 minutes. Then I purified it with iodine tablets. I did this for every use, including washing, because I didn’t want any bacteria (ie necrotizing fasciitis) to get into a wound (which by the way, you will get a lot of cuts living outside).
FOOD
Since I spend a majority of my time in the woods, my diet consists mostly of canned foods and dried foods so they do not spoil. I have a small insulated cooler when I do get produce, but the ice melts fast and I have to eat the food within 2-3 days otherwise I will risk getting a food borne illness. Because of the space limitations in my car I cannot have a plug in cooler or a larger one, it’s just not practical. Some things to consider when looking at keeping perishables:
• If you opt for some kind of plug in cooler you need to keep track of your usage otherwise you will completely drain your car battery. I have gone through three batteries since 2009 just from charging my cell phone, laptop and camera batteries.
• Keep your cooler from direct sunlight to keep the ice from melting too fast. It is best to cover them in blankets when possible; clothing is okay but not optimal.
• Always clean you cooler after every use and wipe down with whatever you use as an antiseptic. I use Dr. Bronner’s Sal Suds and then wipe down with 80 proof vodka (40% alcohol).
I try to keep my dry foods light and quick to cook. For example, you will use at least half a canister of propane to cook dried beans. Canned kidney beans cook in just 5-10 minutes. Raw potatoes (red or white) need to be boiled for about 15 minutes, not including the time it takes to heat the water to boiling. Forget about fresh meat unless you have at least one and a half canisters to do this properly. Propane canisters can be expensive running about $2.50 per generic brand canisters. These can be purchased virtually anywhere from Kmart to Wal-Mart to any hardware store (if you can tolerate them).
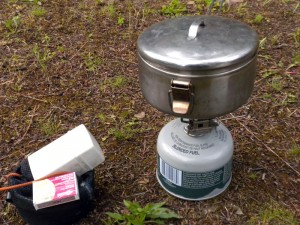 I also have a small GigaPower backpacking stove by Snowpeak. This is extremely valuable and necessary for survival in remote areas and is not a luxury. Many times weather conditions are so bad that a regular kitchen cannot be set up. When the weather is cold you desperately need hot fluids at the very least to keep you warm (and to keep your morale up). A backpacking stove can be set in small sheltered areas like rocks, downed logs, behind snowdrifts, large trees or you can build a small wind break out of limbs and boughs and rocks.
I have to add the following disclaimer: DO NOT use your back packing stove near grass, bushes or other dry material in the spring, summer and fall. You need to clear an area around the stove free of combustibles to prevent starting a forest fire.
Portable propane stoves can be one burner or up to four. The larger stoves however take larger propane tanks, not bottles, and would not be practical for stowing in the car. I have a cheap knockoff of Coleman called “Century” that my Mom got from a garage sale. That would be the best thing is to get a lightly used stove from a garage sale. If you need to buy new there are many generic brands that are just as good as Coleman. Here is what you need to look for:
• Portability and weight. Will the stove fit in your car and be easy to retrieve, especially when you are not feeling well?
• Ease of use. A portable stove should be easy to set up and take down with as few components as possible.
• Durability. The Century stove I have has a lid that lifts up vertical with two metal “wings” on each side to provide some protection from the wind. The metal is mostly painted aluminum with a steel grate. It’s been holding up nicely.
• Affordability. Do shop around a little bit and see what is out there. Online you can check out Campmor, Cabelas, Sierra Trading Post and some of the outdoor outfitters like REI, North Face, MSR and Snowpeak. I’ve found buying the backpacking stove (especially the one from MSR) to be affordable in outdoor sporting goods stores. I have also seen them in army surplus stores.
I also carry trioxylene tablets in my backpack/go bag. These are sterno type tablets that ignite quickly and burn very hot. You can use these in extreme circumstances by placing the tablet on a non-combustible surface (ie. rock) and use a small aluminum container (about 1-1 ½ cup) to heat water or cook canned soup or noodles. These do not last very long so whatever is being cooked needs to be non-perishable food. The trioxylene tablets were (and might still be) used in the military to cook MRE (Meals Ready to Eat) in small aluminum containers the soldiers carry. In dire circumstances you can also use them to start a campfire. Yes, these are more than likely toxic (and may give off formaldehyde – a warning for those reactive to it), but you always need a contingent plan should you get stranded and your fuel canisters run out. These are available in most army surplus stores and maybe some outfitting/outdoor stores.
As for pots and pans, I have a mix of aluminum (I know, gasp, aluminum, but I am not cooking acidic foods most of the time) to high end titanium. It’s best to get small to medium size pots because they heat faster, requiring less fuel and you’ll need one that fits on you backpacking stove. Again, places to find these are the local outdoor stores, Campmor, Cabelas, Sierra Trading Post, REI, North Face, MSR, etc.
Here is a partial list of what is in my pantry:
• Canned kidney beans, black-eyed peas, garbonzo beans, carrots, potatoes, tomatoes, chili, soup
• Sardines
• Instant Brown Rice
• Uncle Ben’s instant brown rice meals in pouches (teriyaki rice, Spanish rice, etc.)
• Instant noodles
• Apple sauce in individual servings
• Canned peaches, pears, fruit cocktail (in water)
• Olive oil, canola oil
• Aluminum foil, one gallon baggies, plastic wrap (all of which can be purchased as “non toxic”)
• A whole bunch of different spices, salt
• A variety of teas
• Unsweetened cocoa
• Sugar (honey in the summer)
• Coffee (decaf and caffeinated)
As you can see the nutritional value is sorely lacking in this list. This is why I wanted to let people know the reality that their diet is going to change and they will have less access to fresh produce. This greatly impacts health and ability to heal. Those who are living in trailers have many more options.
Lastly, do not cook in or near your tent, especially in bear country. Change out of the clothes you cooked in to different clothes at bed time if you are sleeping in a tent. Ideally you should cook at least 50 feet from your tent. However, I have broken this rule while in the middle of a three day deluge and needed to keep out of the rain as much as possible. I cooked outside my tent in the vestibule (the part of the rain fly that extends out from the door). Always store your food in the car at night and do not take food with you into your tent. This is not only for your protection but for the animal as well. Animals habituated to human food are usually destroyed by Fish and Game. I was charged once by a black bear while backpacking and it followed us for over a mile. It had become used to human food and was trying to get at ours even though we had our food packed in wet/dry bags in our packs to minimize the scent.
HYGIENE
All I can say is, “to each his own”. Everyone has their soaps they tolerate so I am not even going to cover the breadth of what is out there. As for myself I use Dr. Bronner’s Almond or Tea Tree oil liquid castile soaps. I sometimes switch to coconut oil based soap when the air is drier. I use Earth Science’s fragrance free shampoo and conditioner.
I have a fifth of vodka to make an antiseptic toner. I mix it with tea tree oil and it’s a damn good astringent and wound cleaner. I think my wounds heal faster with that than with anything else. Lastly, if you live outside 24/7 and cannot tolerate campground showers, you will have to accept the indignity of taking sponge baths a majority of the time. Many of the times it is cold, rainy, windy, etc. and not good for completely stripping down to bathe. Then again if you’re feeling adventurous, try taking a dip in a mountain stream year round. That will test your resolve. Also, you have to consider the human factor and make damn sure no one is around to see you. Not only is this awkward, it can be dangerous or possibly lead to being arrested for indecent exposure.
For a quick bath, just target those areas prone to stinking (you know what I mean) and folds in the skin where bacteria accumulate. The face is also very important because you want to keep healthy looking and not disheveled and greasy.
HOW TO DIG A LATRINE/CAT HOLE/PIT TOILET
If you are eating right now, I recommend coming back later to read this. First, I strongly recommend getting an army surplus folding shovel that has both a shovel and a pick (also known as a trenching tool). The pick cuts through rocky soil, saving the shovel from being bent. These are also fairly cheap on eBay (don’t get suckered into buying “Official Marine” shovels for $25 and up. Yes, these are of great quality, but my experience has been that a $10 one does just fine and I am not expecting any insurgent attacks in my camp (but then again stranger things have happened). Make sure you get one that is steel, not some other metal or alloy. I bought a cheap one made of pig iron from China and the shovel broke only after three uses. All components must be metal otherwise they will break or jam if they are plastic. You can also opt for a metal hand trowel that is sold in virtually every sporting goods, outdoors store as well as the big box stores. They are small folding trowels that are good for digging small “cat holes” when you can’t dig a larger waste pit (mine is called “U-Dig-It” and is metal).
The standard depth of a latrine is 6 to 8 inches deep. In the woods and mountains or any place where the soil is rich with decaying plant material you can get by with digging a 4 inch deep hole. This is soil rich in microorganisms that will break down the waste efficiently. Be sure to cover the hole with plenty of dirt and plant material so that it can’t be seen or stepped in. Yes, I have stepped into someone’s disgusting poo where they just crapped on the ground and left it there. A side note, Arizona was the worst for people just leaving their waste on the ground and not burying it. Really, out of all the states I have traveled, Arizona has the horrible distinction of having people with the worst hygiene and outdoor etiquette. The desert or arid areas are a different story. The sand and rocks are lacking enough microorganisms to properly break down waste. It is not recommended that you cover your waste with just rocks above ground because it will become a petrified turd and dried out toilet paper for some hapless individual to find while picking up rocks for a fire pit or tent site. But there’s always a chance the animals will eat it, but not likely. If you absolutely have to do this because the ground is too rocky to dig a deep hole, then dig a shallow one, place dirt over it and whatever vegetation is around and then top it off with rocks. The decaying vegetation will help in the decomposition of the waste.
In some areas of the desert you are required to pack out your toilet paper, but can leave the solid waste behind (pun intended) so long as it is properly buried. In the desert you may have to dig up to 10 inches to ensure the elements will not uncover your waste (i.e. sand). However, in some national parks, national forests, BLM, you are required to pack out all of it. Yes, you will have to poo in a bag. Gross, but necessary. Outdoor stores do carry solid waste bags (there are “Biobags” made of biodegradable material for handling waste). Backpackers who plan on going to these areas use these. They are durable, but some are scented. You can always opt for a garbage bag, but I recommend double bagging the waste so that it does not leak. Baking soda or clay kitty litter can also be added to keep the stench down. That’s the basics for pooping in the woods or desert.
In the next installment I will cover clothing and then survival gear. I am saving first aid for the last part.
read Part 1 | Part 3 | Part 4 | Part 5
photos: © Vanessa


0 Comments