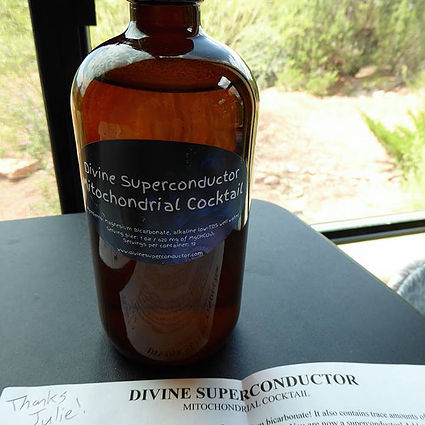
This year I learned from Morley Robbins of gotmag.org that vitamin B6 helps get magnesium INSIDE your cells, boron helps KEEP magnesium inside your cells (you can use trace mineral drops in your water that contain boron), and magnesium bicarbonate helps get magnesium inside the MITOCHONDRIA, the energy center of your cells. Health + Longevity Researcher Matt Blackburn used to sell homemade magnesium bicarbonate (pictured above) so I started ordering it from him since I’ve had years of electrolyte imbalance that was not helped by the typical tri-salt supplements that many take. I was amazed to discover that within a few weeks, my daily severe foot cramps were eliminated. Matt also sold a video that explained how to make the mag-bicarb drink at home, so I now make it myself to save money long-term. He no longer offers the magnesium products or the original video instructions so I wanted to share with you all the directions on how to make this at home so you, too, can benefit from getting magnesium into your mitochondria.
SUPPLIES NEEDED
• Soda Sparkle Home Soda Maker Kit with 1 Liter Bottle
• Soda Sparkle Chargers – Pack of 96 (This is not needed up front because the kit comes with a pack of 5, but eventually you will want to buy these chargers in bulk to continue to make these at home – you will use 1 charger each time you make a batch, which if you take 1x day should last about a week. I’ve been taking it 4x day so you can see why I wanted to buy the largest pack I could find!)
• Food Grade Magnesium Hydroxide (you can buy a different brand and/or different size package, this is what I bought for myself)
• Food Grade Calcium Carbonate (you can buy a different brand and/or different size package, this is what I bought for myself)
• Food Grade Potassium Carbonate (you can buy a different brand and/or different size package, this is what I bought for myself)
• Aluminum Free Sodium Bicarbonate (baking soda) (you can buy a different brand and/or different size package, this is what I bought for myself)
• RO water (acid/mineral free)
• glass jars for making and storage (I use quart-size wide mouth mason jars, you can use any clean glass jar you want.)
• non-metal measuring spoons
DIRECTIONS
1. Pre-cool 1 liter (34 oz) of RO water overnight in refrigerator. (Note: Do not use spring water or distilled water, as there is a great chance that the water will have multiple different types of acids in it. The acids will neutralize the bicarbonate that you create. Also, do not use chlorinated tap water – if the water isn’t properly vented before carbonation a bit of chlorine gas will release each time you open the bottle.)
2. Pour chilled water into the Soda Sparkle bottle to the water fill line.
3. Screw the top on tightly, insert one of the CO2 chargers in the top, and release the CO2 (see Soda Sparkle Kit for instructions on how to do this).
4. Shake the bottle for 5 seconds.
5. Unscrew top and pour into mason jars. When I make just one batch at a time, I fill one mason jar to the 3 cup line and use another for the remaining liquid. Lately I’ve been making two batches at once and filling 3 mason jars equally.
6. Close lids tightly (you want as little oxygen to get into the bottle as possible).
THEN, ADD TO EACH BOTTLE:
7. Trace amount of potassium carbonate. You literally just need to add a sprinkle of the powder. Adding more won’t hurt, but you will be left with powder in the final product that is just wasted.
8. Trace amount of calcium carbonate. Again, just add a sprinkle of the powder.
9. 1/2 teaspoon of magnesium hydroxide.
10. Put lids on and shake – put bottle(s) in sink because the liquid might spill over once you shake them.
11. Once you shake them, put bottles in the refrigerator for 1/2 hour to cool.
12. After 1/2 hour passes, shake each bottle again and add a trace amount (just a sprinkle) of sodium bicarbonate (aluminum-free baking soda).
13. Return to fridge for use. I usually keep mine in a clear mason jar in the fridge. Matt was bottling his in dark amber glass bottles. You can keep it at room temperature but it will last much longer if it is kept in the refrigerator.
The liquid should be fairly clear – not milky – and there may be a very slight layer of mineral sediment that forms at the bottom of the glass bottle. That is normal, but you may want to avoid drinking all the way down to that layer as the minerals can be irritating to the gut.
TO USE:
Add 2 TBS of magnesium bicarbonate to a 16 oz glass of water and sip throughout the day.
I have increased slowly over many months and now take 2 TBS of mag bicarb in a 16 oz glass of water 4x day because my magnesium needs are very high.
If you make this at home, I’d love to hear how it works for you. This has been the only thing to help my chronic and severe foot cramps in many years!
UPDATE MAY 23, 2019: Matt has simplified this process and made a new video with instructions on how to make simple magnesium bicarbonate. Essentially, all you need is the magnesium hydroxide combined with the carbon dioxide from the Soda Sparkle kit. The calcium carbonate, potassium carbonate and sodium bicarbonate are not necessary to create the magnesium bicarbonate, but were used in the original recipe to balance the electrolytes. Matt says “as long as you’re drinking orange juice and milk and eating salt, you’re getting a ton of potassium, calcium and sodium.” I don’t drink orange juice or milk and the original recipe was working well for me, so I personally will still use the original more complicated process. Feel free to use his new, simplified version if you wish – and especially if you already have plenty of dietary sources of calcium, potassium and sodium!




Thanks for sharing this and also thanks to Matt!
Thanks for sharing. If you don’t have access to RO water, are there any other options?
Thanks