

photo provided courtesy of affairsofliving.com
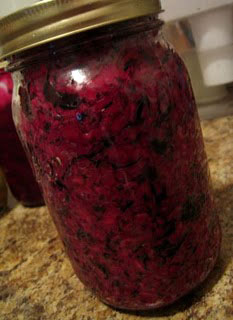 Vinegar free, lacto-fermented “Red Sea” sauerkraut
I call this my “Red Sea” Sauerkraut. Why? Because this naturally cultured sauerkraut is a blend of red cabbage and a trio of tasty seaweeds (wakame, hijiki, and dulse). Together, they combine to make a vibrant red sauerkraut that is spiked with loads of nutrition from the sea and lots of good bacteria. Red cabbage and seaweed were made for each other!
While each of these sea vegetables is delicious on its own, when combined, they add fun texture and an impressive list of health benefits. If for some reason you are a bit squeamish about introducing sea vegetables into your diet, this is an easy, tasty way to do it. Sea vegetables offer unique nutritional benefits that are incomparable to other foods, because they absorb minerals found in the sea. Plus, they a high amount of iodine, a mineral that is often hard to come by in many other foods. Here are some of the fabulous things sea vegetables have to offer:
• Lots of nutrients: iodine, vitamin K, iron, calcium, magnesium, and many other minerals
• Good source of folate and high in fiber
• Naturally anti-microbial and regulating to gut bacteria
• Supports healthy thyroid function, kidneys
• Healthy, flavorful substitute for salt in recipes
ingredients
2 small or 1 large red cabbage, organic if possible
2 T dry wakame
2 T dry hijiki
2 T dry dulse flakes
2 T salt
directions
- Wash cabbage well and remove outer leaves.
- Core cabbage with a sharp knife, and thinly slice/shred cabbage, using lots of patience and that sharp knife, or a food processor.
- Place wakame and hijiki in a bowl with water to rehydrate, for 15-20 minutes.
- Place cabbage in large bowl with salt, stir to mix, and let sit for 10-15 minutes.
- Squeeze cabbage with clean hands or pound with a wooden spoon/mallet until cabbage is softened and juicy. This is an important step, don’t give up!
- Drain and rinse seaweed. Add to cabbage, along with dulse flakes. Stir to mix evenly.
- Place a handful of cabbage in a clean, sterilized wide mouth 1 qt jar (or two 1 pint jars). Press down with your fist or a mallet firmly. Add more cabbage, press. Continue until all the cabbage is gone or until you are about 1 inch from the top of the jar. It will be juicy and messy!
- Screw the top on firmly, and let sit out at room temperature for 3-4 days. Make sure to put jars in a tray or plate to catch leaks and drips – purple rings will stain counters!
- After fermenting, transfer to cold storage.
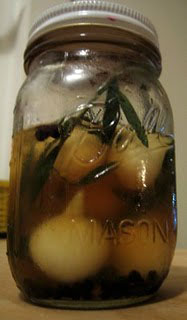 Vinegar free, lacto-fermented pickled spiced pearl onions
adapted from Sally Fallon’s Nourishing Traditions
This recipe is inspired by Sally Fallon’s recipe, but I switched around the seasonings to fit with my allergies and what I had in my pantry. I let it ferment for three days, and it is now in my fridge. I threw a few on my salad for lunch today and they were awesome!
ingredients
10-12 oz pearl onions
1 tsp black peppercorns
5 whole allspice berries
a few sprigs fresh tarragon
1 T salt
1/2 c water
directions
- Blanch pearl onions in boiling water for about 10-20 seconds to help remove skins. Rinse with cold water, and peel.
- Pack whole onions into jar with spices and tarragon, pressing down lightly. Dissolve salt in water, and pour over onions. There should be about 1″ of space between top of water/veggies and jar lid.
- Close tightly, and let sit at room temperature for about 3 days before transferring to cold storage. Can be eaten right away, but becomes tastier with age; will keep for up to 8 months in refrigerator.
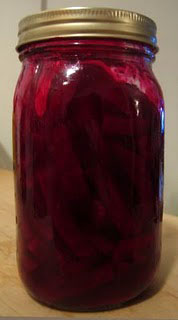 Vinegar free, lacto-fermented pickled beets
adapted from Sally Fallon’s Nourishing Traditions
ingredients
12 medium beets (I used about 4 large beets)
seeds from 3 cardamom pods
2 T salt
1 c water
directions
- Prick beets in several places, place on a cookie sheet or in a large roasting pan. Sally’s recipe calls for baking at 300º for about 3 hours, or until soft. I didn’t have that kind of time – I baked at 425º for about an hour, with tin foil over the pan.
- Once beets are soft, let cool slightly. Peel (run under cold water, and skins come right off!), and cut into a ¼-inch julienne. (Do not grate or cut beets with a food processor—this releases too much juice and the fermentation process will proceed too quickly, so that it favors formation of alcohol rather than lactic-acid.)
- Place beets in a quart-sized, wide-mouth mason jar and press down lightly with a wooden pounder or meat hammer. Combine remaining ingredients and pour over beets, adding more water if necessary to cover the beets. The top of the beets should be at least 1” below the top of the jar. Cover tightly and keep at room temperature for about 3 days before transferring to cold storage.
Makes 32 oz (4 cups/1 qt) Red Sea sauerkraut, 1 pint (16 oz/2 cups) Pickled Pearl Onions, 1 quart (32 oz/4 c) Pickled Beets
recipe courtesy affairsofliving.com


Yum, I need to start making these. Need to be sure to have metal free seaweeds.
Good point Joyce. Do you know any companies that test their seaweed for mercury, etc.?
Maine Coast Sea Vegetables tests for pesticides, herbicies, PCBs, petroleum residues, heavy metals, and contaminants. See their FAQs here: https://www.seaveg.com/shop/index.php?main_page=page&id=21&chapter=1
I have used many of their seaweeds and love them all!
Oh great!! Thanks Kim, will check them out.
What do you mean by cold storage? How long do you suppose these will keep? The fermentation is somewhat intimidating to me because I’m fearful of thinking something is good to eat, but being wrong and spending time feeling horrid, or worse. I know it is a food preservation method that has been around f o r e v e r, but if your body is new to the goodies, are there any side effects to be aware of, say, should I not be able to depart from the bus quickly enough?
Hi Michelle,
I think she means putting it in the refrigerator! ;-)
If you are concerned about the effects of probiotics on your digestion, I would recommend you start with small amounts to see how your body responds. We are all different. But it should ultimately help your digestion, even if it takes a bit to adjust to the increased beneficial flora in your intestines…