
by Natural Culture of instructables.com

These biodegradable eggshell planters are perfect for starting seeds! When the plants get too big for the shells, you can transplant them straight to the soil, shell and all.
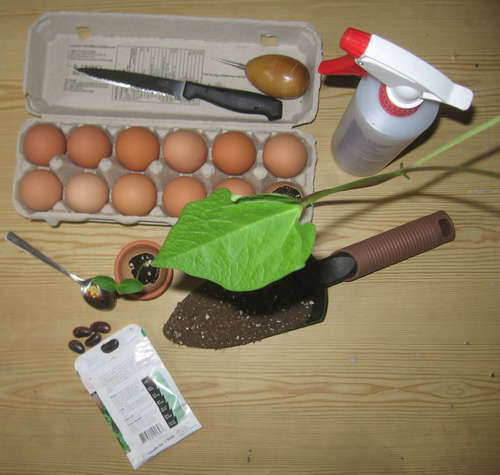 step 1 Materials
You will need: Eggshells, Egg carton, Potting soil & spoon, Awl/needle/pin – anything long and sharp, Knife, Seeds
Optional: Pot & stove, Spray bottle, Egg cups/miniature clay pots for display
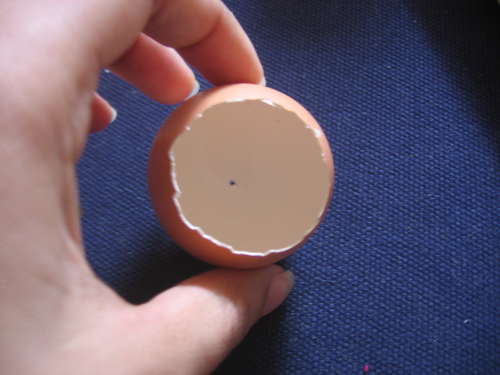
 step 2 Prepare the eggshells
If you eat eggs, then save the eggshells when you use them. If you don’t eat eggs, ask a friend to save the shells and carton for you.
1. Carefully crack the top third of the egg. You can do this by tapping the egg on the edge of a bowl, or tapping with a sharp knife.
2. Empty out the eggshells completely.
3. Wash the eggshells out well.
Optional step: If you are concerned about salmonella on the eggshells, put the empty eggshells in a pot of boiling water for a few minutes.
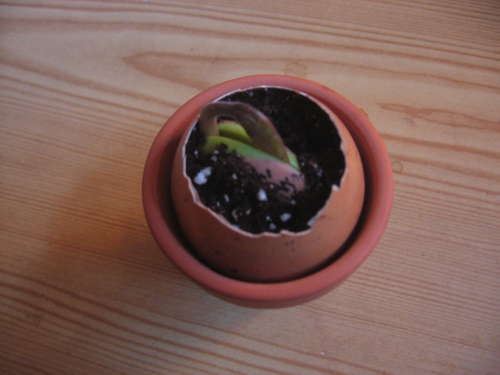
 step 3 Add Drainage
Take the empty eggshell, and poke a hole in the very bottom with your sharp object. If you are using a thin needle or pin, widen the hole a bit with a pushpin or small nail. This hole provides drainage, so the roots of your plant don’t drown. You only need to poke one small hole; more than one might crack the shell.
 step 4 Add Potting Soil
Using a small spoon, fill the eggshell with moist potting soil.
Optional: If the potting soil is dry, spray it with water from a spray bottle as you fill the eggshell.
 step 5 Add Seeds
Think about the amount of light you have available in your home and garden, and use seeds that will thrive in these conditions. Plant your seeds according to directions. The seed package will tell you how deep to plant the seeds, or can find this information online.
If you want quick results, try beans or cucumbers – they usually sprout in a few days. For bonus points, use seeds that you saved from last year’s crop instead of buying seeds. Oh my goodness, seeds are AMAZING!
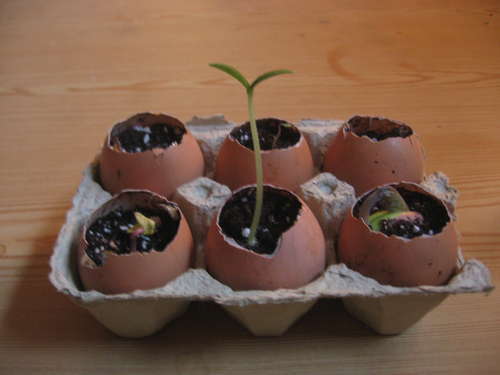 step 6 Enjoy!
Display your green treasures!
Carton: After you have planted the seeds, you can simply put the eggshell planters back into the carton. The carton provides a stable base with room for drainage, is freecycled and looks cute.
Clay pots: You can get miniature clay pots, or use eggcups to display the planters.
Mini Greenhouse: If you want to keep your seedlings extra snug and promote faster growth, you can make them a greenhouse out of a pop bottle.
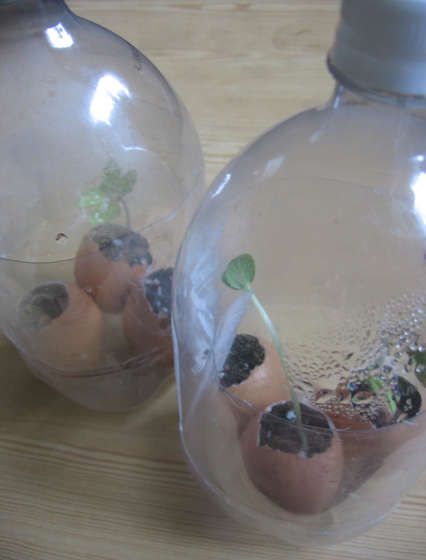 step 7 Care for your plants
Put your completed planters in a sunny spot, and mist them daily with water so that the soil stays moist. For easier care, you can build a simple greenhouse out of a plastic bottle. I did this with mine and it worked amazingly well.
When the plants grow too big for the shells, gently crack the shells and plant them straight into the garden or a bigger pot. The shell will eventually biodegrade, and the roots will grow out of the shell. The shell also supplements the calcium in the soil.
 NaturalCulture shares do-it-yourself (DIY) gardening projects on instructables.com and is a member of reseed.ca, a permaculture/urban gardening not-for-profit collective of gardeners, innovators and artists working to activate the potential in their soils and community in Toronto, Canada.


I love these!
Just in case anyone is lazy like me I will say you really DO have to wash the eggshells out.
I thought maybe I could just let them dry and then use.
The room I had them in smelled of rotting eggs and was so gross.
I will wash them from now on :-)
this is sooo cool!
Libby, thanks so much for bringing the original article to my attention. I loved sharing this fun project with PTers. Please send me any fun links like this that you have in the future…it’s just the type of thing I love to promote, sustainable DIY projects, especially those involving growing, preparing or eating food!
An added bonus if you do this with children is to dye the egg shells first . I loved doing this with my children around Easter.
And hopefully you can get a quiche or large omelet out of the event as well! ;-)